This post contains affiliate links. As an Amazon Associate I earn from qualifying purchases.
I’ve always believed that seafood belongs at the family table, not just in fancy restaurants. This pan-seared ahi tuna recipe reminds me why I fell in love with cooking in the first place—it’s elegant, it’s quick, and it brings real nourishment to your plate without making you feel like you’re missing out on flavor. If you’re looking for other impressive meals that come together fast, check out my Ahi Tuna BBQ Recipe for a different take on this beautiful fish.
The Night My Dad Taught Me That Simple Beats Complicated
I’ll never forget the summer evening when my dad came home from the fish market with two beautiful yellowfin tuna steaks. I was maybe sixteen, and I remember thinking he’d lost his mind—surely something that expensive needed a complicated recipe, right? But he just smiled, mixed together a few pantry staples with that characteristic certainty he had about food, and showed me how to get that perfect sear in a hot pan.
What struck me most wasn’t the technique, though that mattered. It was how he let the fish speak for itself. He didn’t drown it in sauce or mask its delicate, meaty texture. Instead, he honored what was already there and added just enough flavor to make it sing. That lesson shaped how I think about cooking—and about nutrition—today.
What is Ahi Tuna Grilled Recipe?
Pan-seared ahi tuna is a straightforward, elegant dish that comes straight from Hawaiian and Japanese culinary traditions. The fish itself—also called yellowfin tuna—is prized for its firm, lean meat and subtle, slightly sweet flavor. What makes this recipe special is the technique: a quick, high-heat sear that creates a caramelized crust while keeping the inside tender and buttery.
The marinade I use is inspired by Asian flavors—a balance of salty soy sauce, nutty sesame oil, and a touch of honey for brightness. The whole thing comes together in about twenty minutes from start to finish, making it perfect for weeknight dinners or when you want to feel like you’ve accomplished something impressive without spending hours in the kitchen.
What I love most as a dietitian is how this recipe proves that indulgent-tasting food and nutritious food don’t have to be opposing forces. This is real comfort in the truest sense—food that satisfies both your body and your soul.
Why You’ll Love This Ahi Tuna Grilled Recipe
- Takes less than 20 minutes total – From counter to plate, this is faster than ordering takeout, which means you’re more likely to actually make it on busy nights
- Packed with lean protein and omega-3 fatty acids – Ahi tuna gives you nearly 25 grams of protein per serving without excess saturated fat, plus those heart-healthy fats that actually reduce inflammation in your body
- Minimal ingredients, maximum flavor – You’re not juggling a dozen bottles of specialty sauces; this recipe proves that simplicity and deliciousness are natural partners
- Restaurant-quality results at home – That perfect sear with the pink center looks and tastes like you’ve trained professionally, but the technique is absolutely foolproof once you know the timing
- Naturally flexible for dietary needs – Whether you’re watching sodium, avoiding gluten, or following a specific eating pattern, this recipe adapts without losing its soul
- Looks impressive without the stress – This is the kind of dish that makes people think you’re a more confident cook than you maybe feel, which honestly builds your cooking confidence for next time
The Ingredients
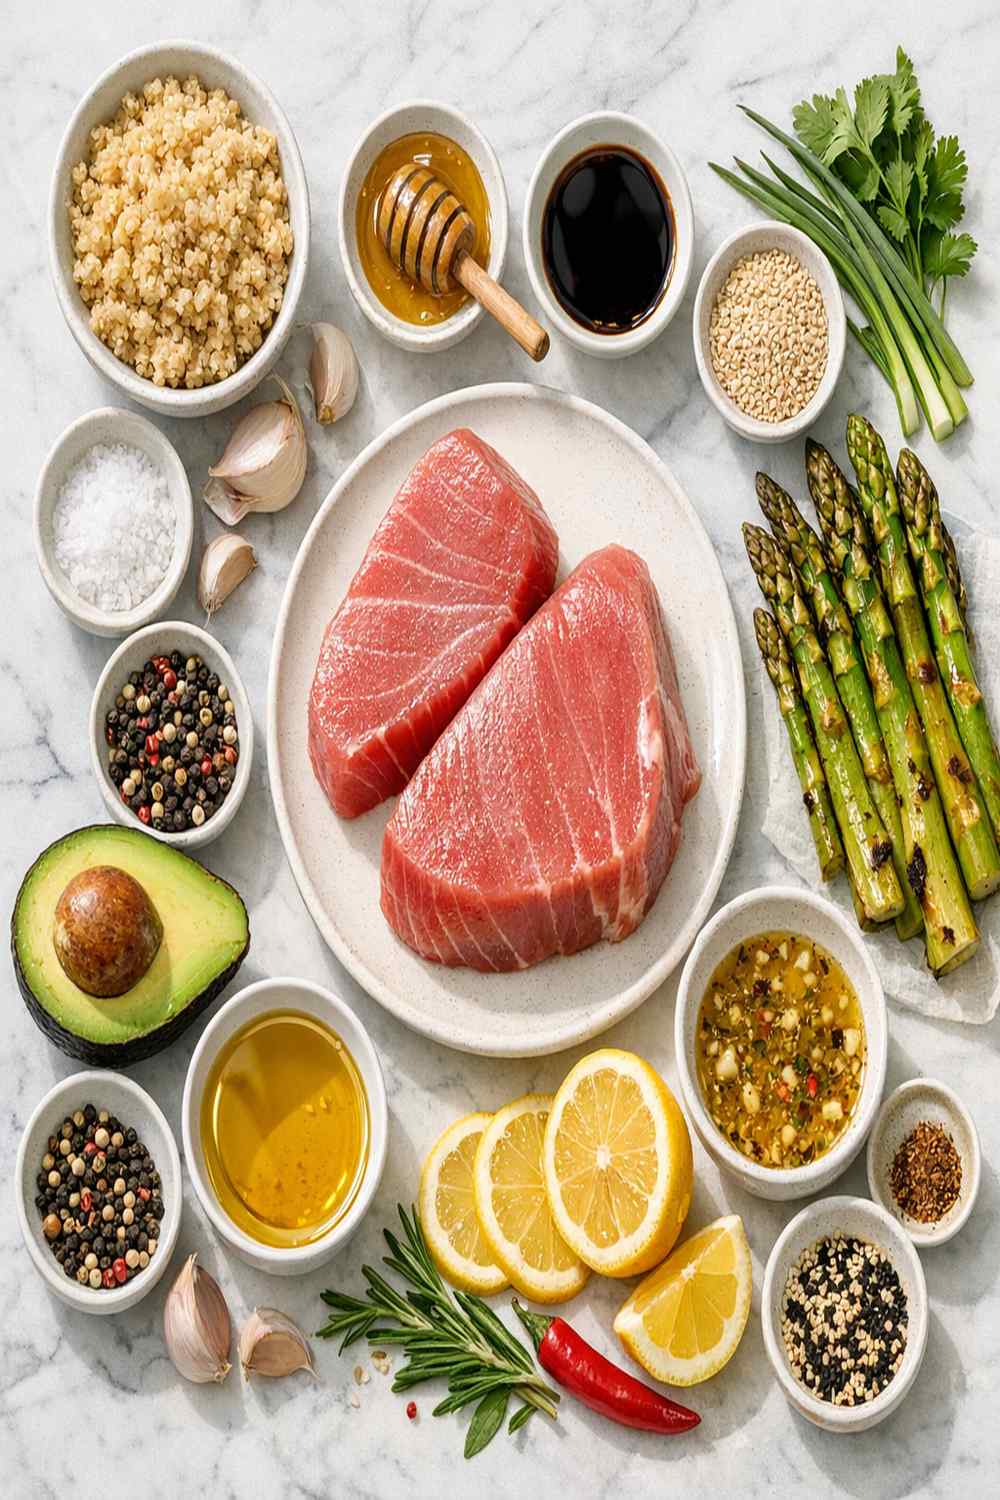
I’ve chosen ingredients that work together in harmony—nothing here is just filler or pretension. Each element serves a purpose, whether it’s building flavor depth or creating that gorgeous caramelized crust. The beauty of this recipe is that most of these items probably live in your pantry already.
- 2 green onions (sliced, for garnish and brightness)
- ¼ teaspoon cayenne pepper (optional but recommended—just a whisper adds warmth without making the dish spicy)
- ¼ teaspoon black pepper (freshly ground if you have it, though pre-ground is perfectly fine)
- 2 tablespoons soy sauce (low-sodium variety if you’re watching your sodium intake, though the full-sodium version works beautifully too)
- 1 tablespoon high-heat cooking oil (canola, avocado, or refined olive oil all work; you need the heat tolerance)
- 1 tablespoon honey (any kind you have works—it dissolves into the marinade and balances the salty-savory notes)
- 1 tablespoon toasted sesame oil (this is non-negotiable; the toasted variety has exponentially more flavor than plain sesame oil)
- 1 lime (cut into wedges for squeezing over the finished dish)
- ½ teaspoon kosher salt (optional, but I recommend it for deepening all the flavors)
- 1 tablespoon toasted sesame seeds (for texture and visual appeal)
- 2 ahi tuna steaks (yellowfin tuna, about 4 ounces each and 1 inch thick—uniform thickness ensures even cooking)
How to Make Ahi Tuna Grilled Recipe?
I’m going to walk you through this step-by-step, with timing and sensory cues so you know exactly what to expect. The most important thing to remember is that this entire process hinges on getting your pan hot enough. That one detail changes everything.
Step 1: Prepare Your Tuna
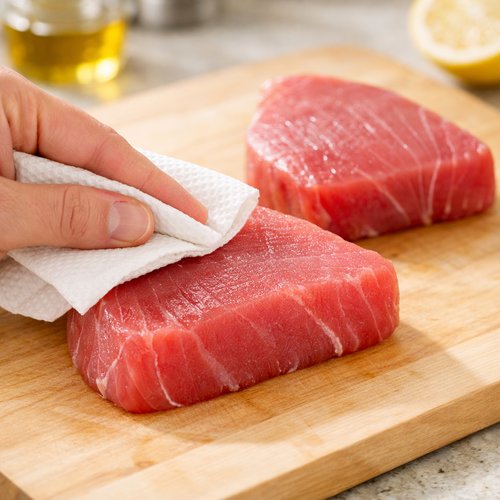
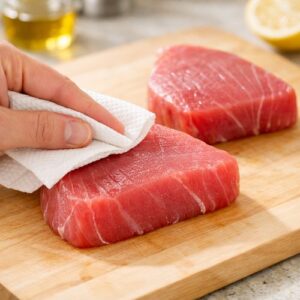
Take your ahi tuna steaks out of the refrigerator and place them on a clean cutting board or plate. Use a paper towel to gently pat them completely dry on both sides. I know this seems like an extra step, but moisture is the enemy of a good sear—it creates steam instead of that golden, caramelized crust we’re after. Don’t be aggressive; just enough pressure to remove the surface moisture. If your steaks are thicker or thinner than 1 inch, keep that in mind for your cooking time adjustment later.
Step 2: Mix Your Marinade
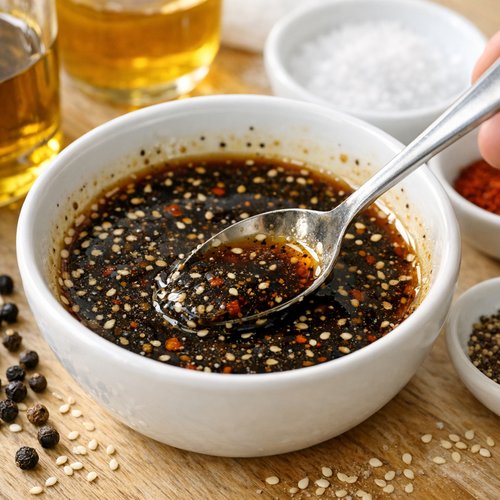
In a small bowl, combine your soy sauce, toasted sesame oil, honey, kosher salt (if using), black pepper, and cayenne pepper. Stir everything together for about thirty seconds until the honey fully dissolves into the other ingredients. You’ll notice the mixture becomes glossy and slightly thickened. This is exactly what you want—the honey acts as an emulsifier, helping everything come together into a cohesive glaze.
Here’s a professional tip: reserve about one to two tablespoons of this marinade before you coat your fish. Keep it in a small dish on the counter. You’ll drizzle this over your finished tuna later for extra flavor and visual appeal, and since you haven’t had raw fish in it, there are no food safety concerns.
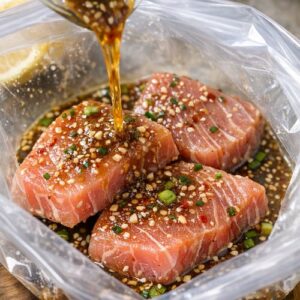
Step 3: Marinate the Tuna
Place your dried tuna steaks on a plate or inside a gallon-sized plastic bag. Pour the majority of your marinade over them and turn each steak to coat completely on both sides. The marinade should coat them like a thin glaze, not pool up like soup.
Now comes the timing question I get asked constantly: how long should you marinate? The honest answer is that even ten minutes makes a real difference, but overnight in the refrigerator creates deeper flavor if you have the time. I usually marinate for at least fifteen to thirty minutes because that gives the soy sauce and sesame oil enough time to penetrate the surface of the fish. If you’re marinating longer than an hour, cover your plate or seal your bag and pop it in the refrigerator.

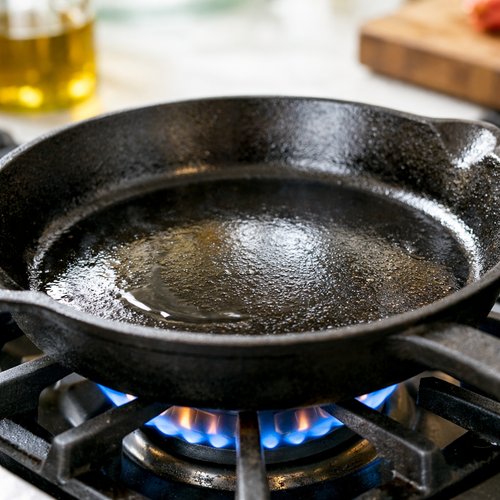
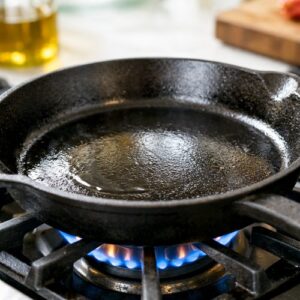
Step 4: Heat Your Pan to the Right Temperature
This is the make-it-or-break-it moment. Place a medium skillet (nonstick or well-seasoned cast iron both work beautifully) over medium-high to high heat. If you’re using cast iron, give it three to five minutes to become properly hot. If you’re using nonstick, about one minute is usually sufficient, depending on your pan’s thickness.
How do you know when it’s ready? I use the water droplet test: flick a tiny bit of water onto the dry pan surface. If it sizzles and evaporates immediately, you’re there. If it just sits there, give it another minute. The marinade has sugar in it, which means it’ll burn quickly if your pan isn’t hot enough—but paradoxically, if your heat is too aggressive, the outside will char before the inside cooks through. Medium-high heat is usually the sweet spot on most home stoves.
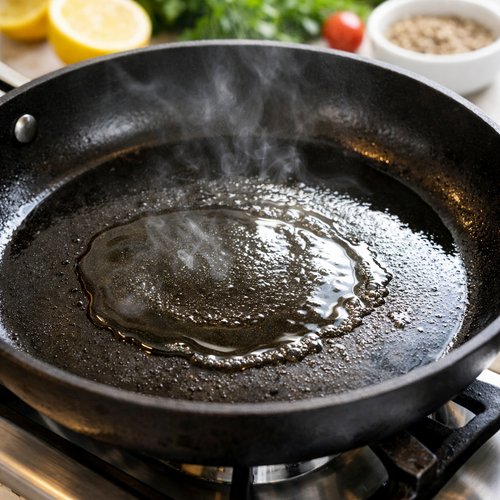
Step 5: Sear Your Tuna
Add your tablespoon of oil to the hot pan and let it shimmer for about fifteen seconds—not long enough to smoke, but long enough to get really hot. Carefully place your marinated tuna steaks into the pan. You should hear an immediate, satisfying sizzle. That sound tells you everything is working.
Leave them completely untouched for one to one and a half minutes. I know the impulse to move them is strong, but this is where the magic happens. The exterior is developing that gorgeous golden-brown crust while the inside stays tender. You’ll notice the edges starting to turn from translucent red to a more opaque color—this is the heat working its way in.
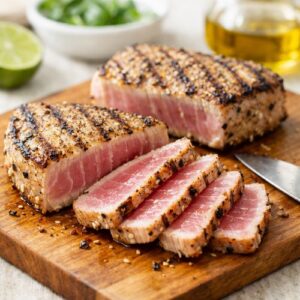
Use a thin fish spatula or regular spatula to flip each steak carefully. Sear the second side for another one to one and a half minutes for medium-rare, which is my recommended doneness for ahi tuna. If you prefer medium-well to well-done, go two to two and a half minutes per side. If you love it nearly raw in the center (some people do), just thirty seconds per side.
The interior temperature should reach 110°F for rare, 120°F for medium-rare, and 130°F for medium when checked with an instant-read thermometer at the thickest part.
Step 6: Rest and Slice
Transfer your finished tuna steaks to a cutting board and let them rest for two to three minutes. I know you’re excited to eat, but this brief rest allows the juices to redistribute throughout the fish, making every bite more tender and flavorful. You’ll notice the fish continues to cook slightly from carryover heat—this is totally normal and expected.
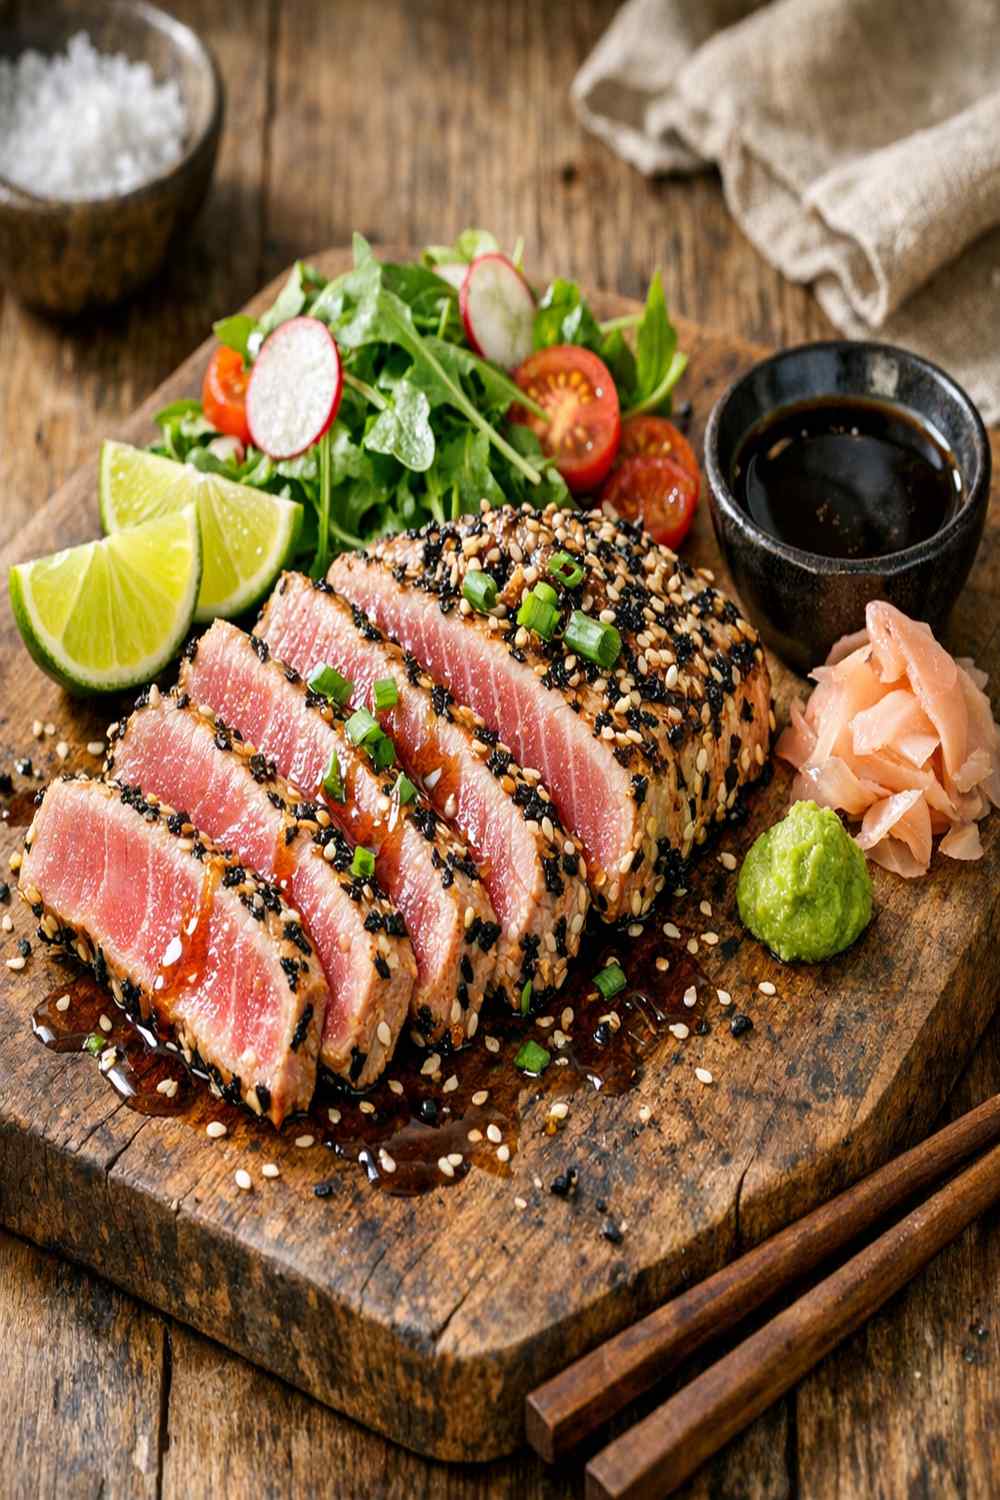
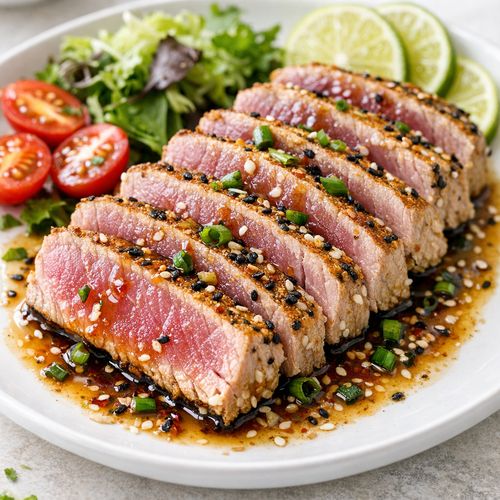
Using a sharp knife, slice each steak into approximately half-inch thick slices. You’ll see those beautiful layers: the golden crust on the outside and the perfectly pink center. This is exactly what we’re aiming for.

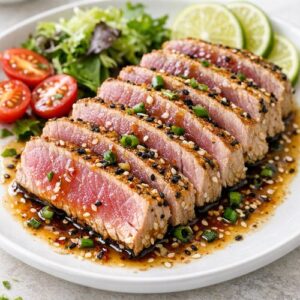
Step 7: Plate and Finish
Arrange your sliced tuna on a serving plate or individual plates. Drizzle with that reserved marinade you set aside earlier—it adds moisture and extra flavor without overwhelming the dish. Scatter your sliced green onions over the top, sprinkle with toasted sesame seeds, and serve lime wedges on the side.
If you find the tuna needs more salt once plated, sprinkle it with flaky sea salt. The coarser texture of flaky salt gives you better flavor control than fine salt, and it looks more intentional too.
Tips and Tricks
- Invest in a good instant-read thermometer – Especially when you’re starting out, knowing the exact internal temperature removes all guesswork and builds your confidence in the kitchen
- Buy your tuna from a fishmonger you trust – Quality matters enormously here since the fish is the star. Ask them to cut steaks that are uniform in thickness so everything cooks at the same rate
- Don’t skip the drying step – It feels tedious, but it’s the difference between a crust and a steamed exterior. Those paper towels matter
- Use toasted sesame oil, not plain sesame oil – They’re completely different beasts. Plain sesame oil is mild and appropriate for cooking; toasted sesame oil is intensely flavorful and aromatic and should be used as a finishing ingredient
- Watch your marinade carefully if heat is high – Different stovetops vary wildly in actual heat output. If you see the marinade starting to blacken on the pan’s surface, reduce your heat to medium-high
- Slice against the grain – Look at the muscle fibers running through your tuna and slice perpendicular to them. This makes every bite more tender
- Serve immediately – Unlike beef or chicken, tuna doesn’t improve as it sits. Get it on plates and to the table while it’s still warm
Expert’s Nutritional Tip
As a registered dietitian, I get genuinely excited about ahi tuna because it’s one of those foods where what tastes good and what’s genuinely nourishing perfectly overlap. This fish provides high-quality complete protein with all nine essential amino acids your body can’t make on its own. But here’s the part that really matters: ahi tuna is loaded with omega-3 fatty acids, specifically EPA and DHA, which have powerful anti-inflammatory effects throughout your body.
Many people think that eating this well requires suffering through boring “healthy” food. This recipe is my answer to that myth. The sesame oil you’re using isn’t just delicious—it contributes its own anti-inflammatory compounds. The honey provides quick energy without refined sugar. The soy sauce gives umami depth that makes your brain register satisfaction and fullness faster. You’re not eating less; you’re eating smarter.
Make-Ahead Guide
This recipe is naturally meal-prep friendly, which is music to my ears on Monday mornings. You can marinate your tuna up to twelve to twenty-four hours in advance. Place the marinated steaks in an airtight container or sealed plastic bag in your refrigerator. The flavors actually deepen as they sit.
On cooking day, remove your tuna from the refrigerator about fifteen minutes before you plan to sear it. Letting it come closer to room temperature ensures more even cooking throughout the steak. This isn’t a long wait, but those fifteen minutes do make a difference.
If you’re meal prepping cooked tuna, store it in an airtight container in the refrigerator for up to three days. I recommend eating it cold or at room temperature on salads rather than reheating it on the stovetop, since reheating can dry out the fish. It’s honestly delicious that way—think tuna salad, but elevated.
Common Mistakes to Avoid
- Starting with wet fish – This creates steam instead of the golden crust you want. Take those extra thirty seconds to pat it dry. I promise it matters more than it seems
- Not letting the pan get hot enough – This is where most home cooks stumble. You need that aggressive heat to create the contrast between the caramelized exterior and the tender interior. If your pan feels like it “might be hot,” it probably isn’t quite there yet
- Moving the tuna around constantly – Let it sit undisturbed for that full minute to one and a half minutes per side. Flip it once and only once. Your hands want to help, but your best help is staying out of it
- Using regular sesame oil instead of toasted – I see this happen more than you’d think. Regular sesame oil is nearly flavorless and has a different smoke point. It’s not an acceptable substitution—grab the toasted version
Seasonal Variations
Spring: Add fresh ginger to your marinade (about one-half teaspoon, minced) and top your finished tuna with microgreens and fresh radish slices. The brightness perfectly matches spring eating.
Summer: Make this the centerpiece of a grain bowl with quinoa, cucumber, avocado, and that lime dressing. It’s light but satisfying, which is exactly what you want when it’s hot outside.
Fall: Switch your lime to fresh lemon and add a pinch of smoked paprika to your marinade. Serve alongside roasted root vegetables for earthiness that complements the fish beautifully.
Winter: Create a cozy tuna bowl with warm jasmine rice, roasted broccoli, and drizzle the sesame marinade over everything. It feels nourishing and grounding when the weather is cold.
Can I Store Ahi Tuna Grilled Recipe?
Raw marinated tuna keeps in your refrigerator for up to twenty-four hours before cooking. After that point, I recommend cooking it or discarding it—fish doesn’t improve with time, and food safety is paramount.
Cooked tuna slices store beautifully in an airtight container in the refrigerator for three days. Rather than reheating on the stovetop (which tends to dry it out), eat it cold or at room temperature. It’s genuinely delicious this way, whether you’re having it for lunch or using it in a salad.
I don’t recommend freezing cooked tuna because the texture changes significantly upon thawing—it becomes stringy and loses that buttery tenderness that makes this dish special. If you do want to freeze, wrap uncooked marinated steaks tightly in plastic wrap and aluminum foil, and use them within three months. Thaw in the refrigerator overnight before cooking, and add just thirty seconds to your searing time since the cold interior will need slightly longer.
Nutrition Information
According to USDA data, one serving of this pan-seared ahi tuna (accounting for about four ounces of fish plus the marinade) contains approximately 200 calories, 25 grams of lean protein, 9 grams of healthy fats, and just 3 grams of carbohydrates. The sodium content is roughly 700 milligrams per serving, primarily from the soy sauce, though you can reduce this by using low-sodium soy sauce or decreasing the amount slightly.
What I love about these numbers is that you’re getting substantial, satisfying protein in a low-calorie package. The fat comes mostly from omega-3 fatty acids and the sesame oil, both of which support heart health, brain function, and reduce inflammation throughout your body. This isn’t a dish where you’re sacrificing nutrition for flavor—they’re working together.
The carbohydrates are minimal, which makes this perfectly compatible with lower-carb eating patterns if that’s your preference. The honey contributes most of them, and it’s there specifically to help create flavor depth and that caramelized crust.
What Can I Serve With Ahi Tuna Grilled Recipe?
This elegant fish deserves sides that honor its simplicity without competing for attention. I think about balance—if the tuna is rich and filling, I want vegetables that are bright and fresh. If I’m serving grains, I keep them straightforward.
- Steamed or roasted bok choy – The mild, slightly sweet flavor complements the tuna perfectly, and it adds nutrition without heaviness
- Jasmine rice or sushi rice – If you want a grain component, these are traditional pairings that work for a reason. They’re delicate enough to let the tuna shine
- Cucumber and avocado salad – Dress it with lime juice, a touch of sesame oil, and flaky salt. It’s refreshing and balances the richness of the seared fish
- Roasted asparagus with garlic – Springy, nutritious, and the garlic plays nicely with the sesame and soy flavors
- Edamame – Simple and protein-packed, they complement the tuna’s umami beautifully
- Miso soup – Start your meal with something warm and salty, then move to the tuna. It’s how Japanese restaurants often structure the meal
- Mixed greens with ginger dressing – Keep vegetables raw and bright; the ginger dressing ties into the Asian flavors of your tuna
If you’re looking for more ideas about serving tuna in different preparations, check out my Salmon Poke Bowls for inspiration on how to build balanced bowls that celebrate quality fish. You might also consider serving appetizers beforehand—something like Annatto Paste Recipe on crackers or crudités would be lovely and won’t fill your guests up before the main event.
Substitutes
- Yellowfin tuna (ahi) can be replaced with swordfish, mahi-mahi, or thick-cut salmon – Each has its own texture and flavor, but all respond beautifully to this marinade and cooking method. Adjust your cooking time slightly based on thickness
- Soy sauce can be replaced with tamari if you need gluten-free – It’s made without wheat and tastes nearly identical. The sodium content is similar
- Toasted sesame oil can be replaced with a combination of peanut oil and a dash of regular sesame oil – It’s not identical, but it captures some of the nuttiness, though I really recommend having the toasted version on hand
- Honey can be replaced with maple syrup or agave nectar – Use the same amount. The marinade will taste slightly different but equally delicious
- Lime can be replaced with fresh lemon – Functionally they do the same job, though lime’s flavor is brighter while lemon is more floral
- High-heat cooking oil can be replaced with refined coconut oil or avocado oil – Both have high smoke points. Avoid extra-virgin olive oil for this application because it smokes at lower temperatures
Ahi Tuna Grilled Recipe
Ingredients
Method
- Take your ahi tuna steaks out of the refrigerator and place them on a clean cutting board or plate. Use a paper towel to gently pat them completely dry on both sides. I know this seems like an extra step, but moisture is the enemy of a good sear—it creates steam instead of that golden, caramelized crust we're after. Don't be aggressive; just enough pressure to remove the surface moisture. If your steaks are thicker or thinner than 1 inch, keep that in mind for your cooking time adjustment later.
- In a small bowl, combine your soy sauce, toasted sesame oil, honey, kosher salt (if using), black pepper, and cayenne pepper. Stir everything together for about thirty seconds until the honey fully dissolves into the other ingredients. You'll notice the mixture becomes glossy and slightly thickened. This is exactly what you want—the honey acts as an emulsifier, helping everything come together into a cohesive glaze. Here's a professional tip: reserve about one to two tablespoons of this marinade before you coat your fish. Keep it in a small dish on the counter. You'll drizzle this over your finished tuna later for extra flavor and visual appeal, and since you haven't had raw fish in it, there are no food safety concerns.

- Place your dried tuna steaks on a plate or inside a gallon-sized plastic bag. Pour the majority of your marinade over them and turn each steak to coat completely on both sides. The marinade should coat them like a thin glaze, not pool up like soup. Now comes the timing question I get asked constantly: how long should you marinate? The honest answer is that even ten minutes makes a real difference, but overnight in the refrigerator creates deeper flavor if you have the time. I usually marinate for at least fifteen to thirty minutes because that gives the soy sauce and sesame oil enough time to penetrate the surface of the fish. If you're marinating longer than an hour, cover your plate or seal your bag and pop it in the refrigerator.
- This is the make-it-or-break-it moment. Place a medium skillet (nonstick or well-seasoned cast iron both work beautifully) over medium-high to high heat. If you're using cast iron, give it three to five minutes to become properly hot. If you're using nonstick, about one minute is usually sufficient, depending on your pan's thickness. How do you know when it's ready? I use the water droplet test: flick a tiny bit of water onto the dry pan surface. If it sizzles and evaporates immediately, you're there. If it just sits there, give it another minute. The marinade has sugar in it, which means it'll burn quickly if your pan isn't hot enough—but paradoxically, if your heat is too aggressive, the outside will char before the inside cooks through. Medium-high heat is usually the sweet spot on most home stoves.
- Add your tablespoon of oil to the hot pan and let it shimmer for about fifteen seconds—not long enough to smoke, but long enough to get really hot. Carefully place your marinated tuna steaks into the pan. You should hear an immediate, satisfying sizzle. That sound tells you everything is working. Leave them completely untouched for one to one and a half minutes. I know the impulse to move them is strong, but this is where the magic happens. The exterior is developing that gorgeous golden-brown crust while the inside stays tender. You'll notice the edges starting to turn from translucent red to a more opaque color—this is the heat working its way in. Use a thin fish spatula or regular spatula to flip each steak carefully. Sear the second side for another one to one and a half minutes for medium-rare, which is my recommended doneness for ahi tuna. If you prefer medium-well to well-done, go two to two and a half minutes per side. If you love it nearly raw in the center (some people do), just thirty seconds per side. The interior temperature should reach 110°F for rare, 120°F for medium-rare, and 130°F for medium when checked with an instant-read thermometer at the thickest part.

- Transfer your finished tuna steaks to a cutting board and let them rest for two to three minutes. I know you're excited to eat, but this brief rest allows the juices to redistribute throughout the fish, making every bite more tender and flavorful. You'll notice the fish continues to cook slightly from carryover heat—this is totally normal and expected. Using a sharp knife, slice each steak into approximately half-inch thick slices. You'll see those beautiful layers: the golden crust on the outside and the perfectly pink center. This is exactly what we're aiming for.
- Arrange your sliced tuna on a serving plate or individual plates. Drizzle with that reserved marinade you set aside earlier—it adds moisture and extra flavor without overwhelming the dish. Scatter your sliced green onions over the top, sprinkle with toasted sesame seeds, and serve lime wedges on the side. If you find the tuna needs more salt once plated, sprinkle it with flaky sea salt. The coarser texture of flaky salt gives you better flavor control than fine salt, and it looks more intentional too.
Notes
FAQs
Can I cook ahi tuna in the oven instead of on the stovetop?
Technically yes, but I wouldn’t recommend it unless you’re dealing with a real emergency. The stovetop sear creates that caramelized crust that makes this dish special—you get the contrast between the golden exterior and the tender interior. In the oven, you’ll get even cooking but lose that textural element entirely. If you absolutely must use the oven, preheat it to 400°F, sear your tuna on the stovetop for just thirty seconds per side to get some color, then finish it in the oven for three to five minutes depending on thickness. It’s a compromise, not ideal.
What does ahi tuna taste like?
Ahi tuna has a firm, meaty texture more similar to steak than to delicate white fish. The flavor is mild, slightly sweet, and subtly oceanic without being “fishy” in an off-putting way. It’s why tuna is often called the “gateway seafood” for people who think they don’t like fish. The marinade in this recipe enhances those natural flavors rather than masking them. If you’ve never had sushi-grade tuna, this is your chance to experience how delicious it is when treated simply.
Is it safe to eat tuna with a pink center?
Yes, absolutely—but only with sushi-grade or sashimi-grade tuna from a reputable fishmonger. These grades indicate the fish has been handled with food safety protocols that make it safe for consuming raw or nearly raw. Never buy regular grocery-store tuna and attempt to eat it rare; that specific designation matters for safety. If you’re uncertain about your source, cook it to medium-well for peace of mind. I always ask my fishmonger explicitly about the grade and tell them my intended use.
Why is my tuna steak tough or rubbery?
This almost always means it was overcooked. Remember, tuna is very lean—it has minimal fat to keep it moist. Once the interior temperature exceeds 130°F or so, it becomes tough. This is why timing is so critical in this recipe. Use a thermometer for accuracy, and remember that carryover cooking will continue after you remove it from heat. Another reason could be that your fish wasn’t sushi-grade quality, which affects texture. Finally, if you’re reheating cooked tuna, that almost always results in a rubbery texture—serve it cold or at room temperature instead.
Can I make this recipe if I’m pregnant or have a compromised immune system?
Excellent question because food safety matters. If you’re pregnant or immunocompromised, you should avoid raw or rare seafood entirely. Cook your tuna to a minimum internal temperature of 145°F, which means no pink center. The good news is this recipe still works beautifully—you’ll just cook it a bit longer, maybe two and a half to three minutes per side depending on thickness. Your tuna won’t be as buttery, but it will still be delicious and absolutely safe. Talk to your healthcare provider about your specific dietary needs, and always use sushi-grade fish from trusted sources.
More Recipes You’ll Love
- Ahi Tuna BBQ Recipe – A different approach to yellowfin tuna that celebrates the grill and smoky char
- Salmon Poke Bowls – Another beautiful fish preparation that’s equally elegant and flexible for meal prep
- BBQ Ribeye Recipe – If you love that seared crust and tender interior, this beef preparation uses similar high-heat searing techniques
- these homemade cookies – For when you want to finish this elegant dinner with something sweet and nostalgic
This pan-seared ahi tuna has taught me something new every time I make it, and I’m grateful for that. It’s proof that some of the most meaningful dishes in the kitchen are the simplest ones—where you can taste every ingredient, where technique matters, and where you learn something about yourself through cooking. Your family deserves this kind of food on the table. Your body thrives on this kind of nourishment. And your confidence in the kitchen grows every single time you try something new. Cook what makes you happy!