This post contains affiliate links. As an Amazon Associate I earn from qualifying purchases.

There’s a reason cheeseburger soup shows up on diner menus across America, and it’s not just nostalgia—it’s pure food science. When you combine the Maillard reaction of seared ground beef, the emulsifying power of melted cheddar, and the starch from potatoes creating body and richness, you get a bowl that feels like a hug and tastes like a cheeseburger without requiring a bun. I grew up in Maryland watching my grandmother transform leftover ingredients into meals that made everyone forget their worries, and this soup embodies that exact philosophy. It’s comfort food that actually nourishes you.
The Science Behind Cheeseburger Potato Soup Recipe
When I started working with patients as a registered dietitian, I realized most people don’t understand why certain comfort foods work so well together. Cheeseburger potato soup is a masterclass in flavor and texture balance. The ground beef creates a savory, umami-rich foundation through the Maillard reaction—that browning process that develops hundreds of complex flavor compounds. The butter and flour create a roux, which acts as a thickening agent by allowing starch granules to swell and trap liquid, transforming broth into luxurious, cling-to-your-spoon soup. The cheese doesn’t just add flavor; it emulsifies into the liquid, creating a silky mouthfeel while adding fat-soluble vitamins. Meanwhile, the potatoes break down slightly during cooking, releasing starch that naturally thickens the soup while their cells soften, creating that tender bite. This isn’t accidental deliciousness—it’s chemistry working in your favor.
Why This Recipe Is Nutritionally Superior
I design recipes that prove comfort food and nutrition aren’t enemies. This soup delivers meaningful amounts of protein, essential minerals, and stable carbohydrates in one dependable bowl. According to USDA data, a single serving provides substantial amounts of critical nutrients that support energy, muscle maintenance, and immune function. The beef provides complete protein with all nine essential amino acids, the potatoes deliver resistant starch when cooled (which feeds beneficial gut bacteria), and the cheese contributes calcium for bone health. This is a meal that actually sustains you for hours, not one that leaves you hungry an hour later.
- Complete Protein – Ground beef delivers approximately 25 grams per serving, including all essential amino acids needed for tissue repair and muscle maintenance
- Bioavailable Iron – Beef provides heme iron (2.5-3mg per serving), which your body absorbs at a 15-35% rate compared to plant-based iron at 2-20%, according to USDA nutrition data
- B Vitamins – Beef and cheese together supply B12, B6, and niacin, which are essential for energy metabolism and nervous system function
- Resistant Starch – Potatoes contain 2-3 grams of resistant starch per serving, a prebiotic fiber that supports digestive health
- Calcium – Cheddar cheese contributes roughly 200mg per serving, supporting bone density and muscle function
Ingredient Deep Dive
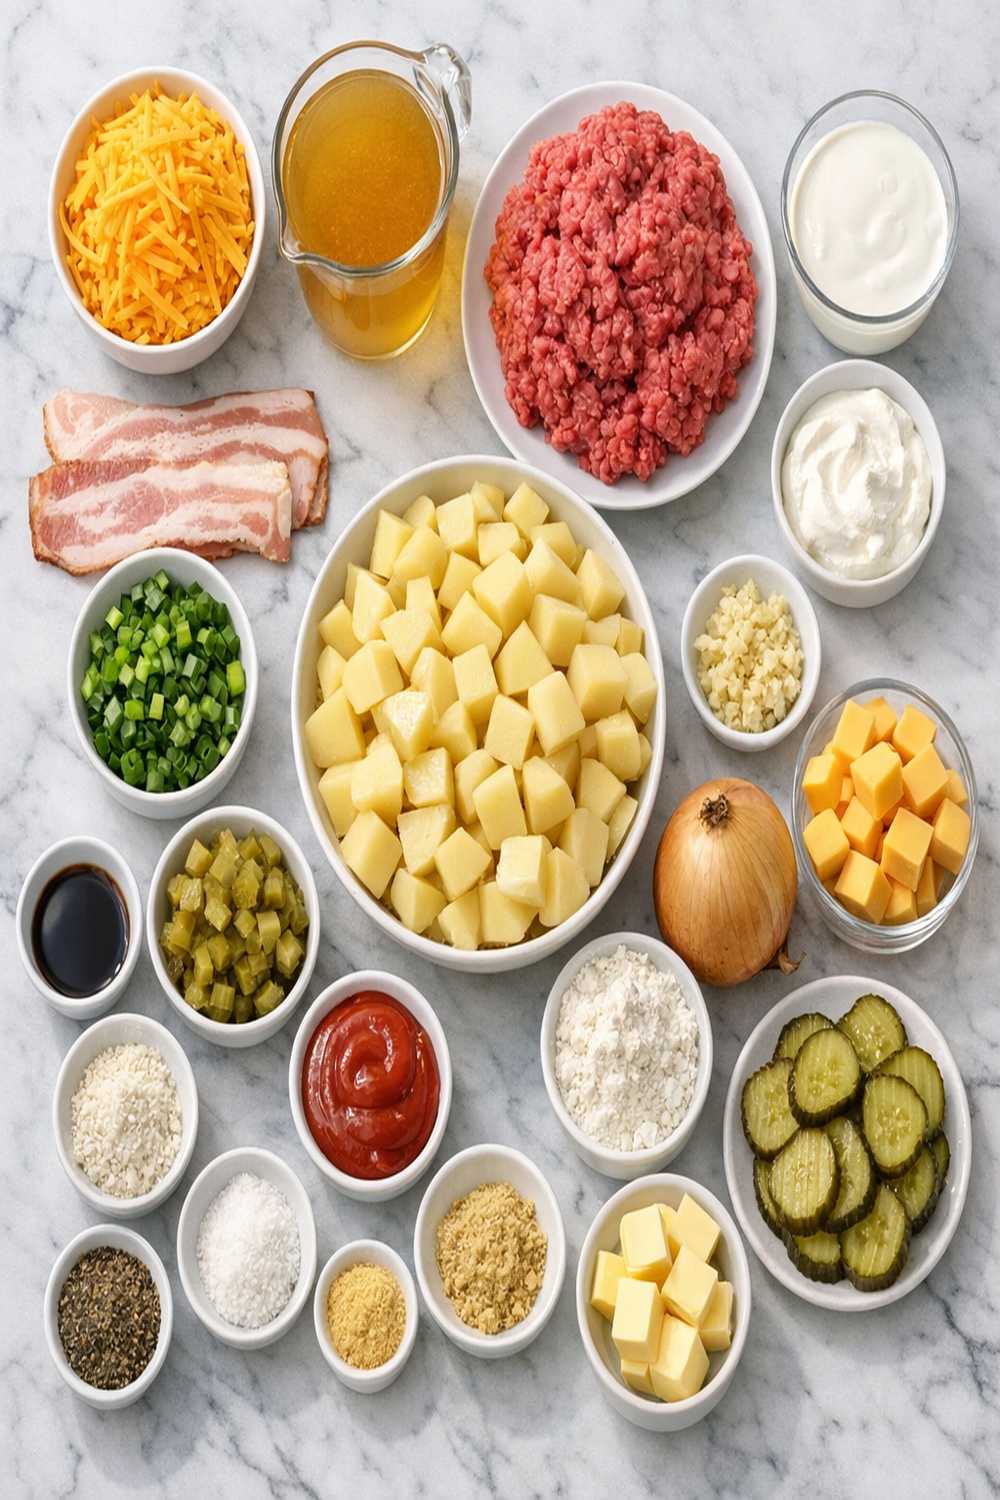
Every ingredient in this soup has a specific job. I never include something just for flavor or texture alone—each component serves a nutritional or structural purpose. Understanding what each ingredient does helps you troubleshoot if something goes wrong and gives you confidence to make smart substitutions.
- 1 teaspoon freshly cracked black pepper (enhances the beef’s savory notes and aids nutrient absorption)
- 1/4 cup all-purpose flour (absorbs and thickens liquid through starch gelatinization; prevents lumpy soup)
- 1 tablespoon Montreal seasoning blend (combines garlic, onion, peppercorns, and coriander for complex seasoning without extra salt; you can use kosher salt and black pepper if needed)
- 1 cup celery, small dice (adds aromatic compounds and subtle sweetness; prevents the soup from tasting one-dimensional)
- 2 cups sharp cheddar cheese, freshly shredded (lower-moisture varieties melt smoothly without becoming grainy; melts at 90-100°F due to milk fat content)
- 1.5 pounds ground beef, 80/20 blend (the 20% fat content prevents the soup from becoming greasy while maintaining flavor; leaner beef produces a drier texture)
- 1 large yellow onion, finely chopped (releases sulfur compounds when heated that create savory depth; about 1.5 cups diced)
- 3 cups beef stock, low-sodium (provides collagen and gelatin for body; salinity matters so you control final salt level)
- 2 cloves fresh garlic, minced (provides allicin compounds that develop nutty, complex notes during cooking)
- 1/2 cup dill pickle chips for serving (acid brightens the heavy flavors; pickles contain probiotics if fermented, supporting digestive health)
- 4 cups russet potatoes, peeled and cut into half-inch cubes (starches create body; half-inch size ensures even cooking in 10-12 minutes)
- 1.5 cups whole milk, full-fat (adds richness and prevents curdling when combined with acidic elements; creates a luxurious mouthfeel)
- 4 tablespoons butter, divided into portions (two tablespoons for browning the meat, two for creating the roux; fat carries flavor and creates the creamy base)
The Technique: How to Make Cheeseburger Potato Soup Recipe Properly
Technique matters more than ingredients in soup-making. A perfectly executed method prevents common disasters like curdled cheese, lumpy roux, or undercooked potatoes. I’m going to walk you through each step the way I teach it in my kitchen, explaining the why behind each decision.
Step 1: Sear the Ground Beef for Flavor Development
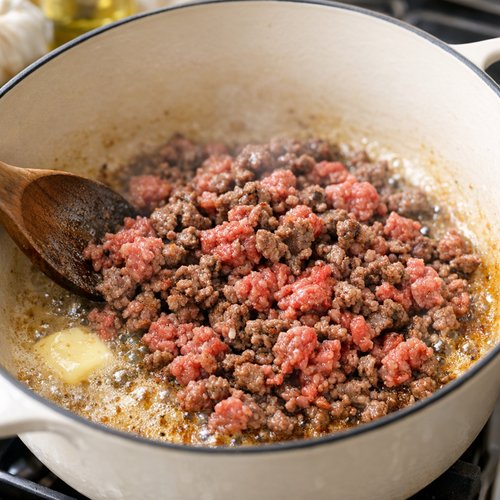
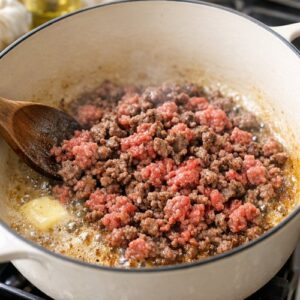
Place your soup pot over medium-high heat and add one tablespoon of butter. Once the foam subsides (about 30 seconds), add your ground beef and Montreal seasoning. Here’s the critical part: don’t stir it constantly. Let the meat sit undisturbed for 2-3 minutes so the surface makes contact with the hot pan. This creates the Maillard reaction—browning that develops hundreds of complex flavor compounds. Use a wooden spoon to break the meat into small, even crumbles. You’re looking for no pink remaining, which takes about 6-8 minutes total. The rendered fat from the beef is liquid gold for flavor, so don’t drain it. Remove the cooked beef to a clean bowl and set aside.
Step 2: Build Your Aromatic Base
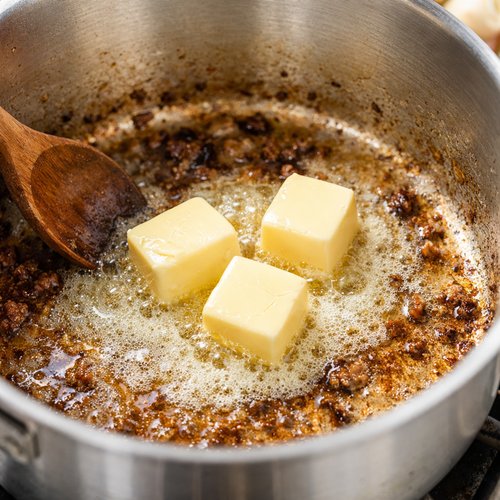
Lower your heat to medium and add the remaining three tablespoons of butter to the same pot (keeping all that browned beef residue on the bottom). Add your chopped onion and stir occasionally. This is where patience matters. You’re not rushing to brown the onions—you’re slowly softening them, which takes about 10 minutes. As the onions cook, their natural sugars convert into caramelized compounds that add subtle sweetness and savory depth. You want them soft and translucent, not crispy. Once they’re there, add your minced garlic and cook for exactly 2 minutes. Any longer and garlic turns bitter; any shorter and its sulfur compounds don’t develop properly.
Step 3: Create the Roux Base
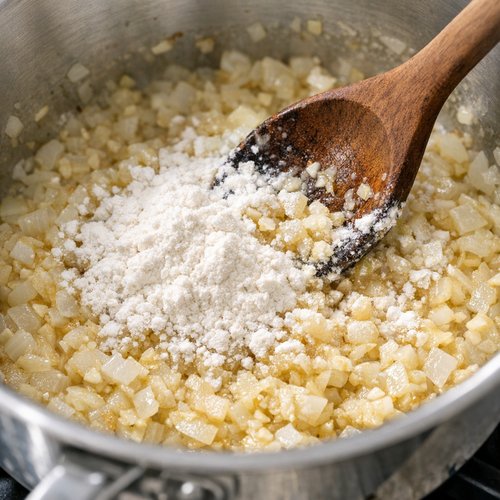
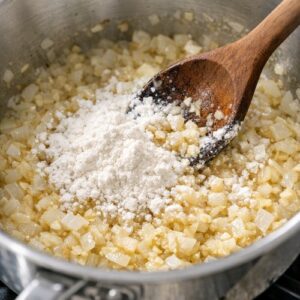
Sprinkle the all-purpose flour over the softened onions and garlic. Stir constantly for 3-5 minutes. This cooking time is essential—you’re cooking out the raw flour taste while the flour particles absorb the fat. The flour coats itself in butter, which prevents lumps from forming when liquid hits it later. You’re looking for a paste-like consistency that smells nutty and toasted, not raw or grainy. This is the foundation of your soup’s texture.
Step 4: Incorporate Liquid and Create the Base
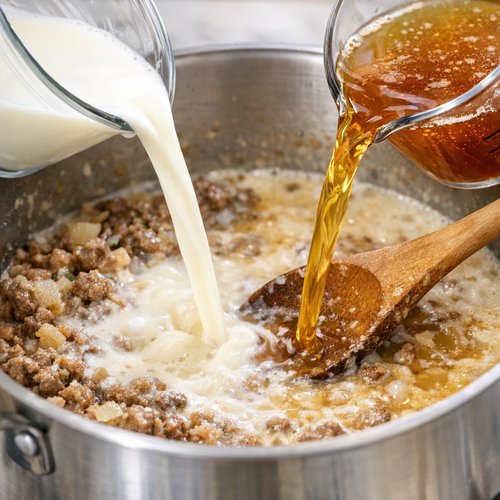
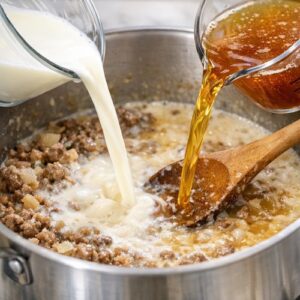
Slowly pour in the milk and beef stock while stirring constantly. This is where the roux does its job—the fat-coated flour particles absorb the liquid and swell, thickening it naturally. Stir for about 1 minute until you don’t see any lumps. The mixture should look creamy and relatively smooth. If you see small flour lumps, use an immersion blender for 10 seconds to break them up. You’re not making a thick gravy yet; this is your soup base.
Step 5: Melt the Cheese Into Smoothness
Add your freshly shredded cheddar cheese in three batches, stirring between each addition. This prevents overwhelming the pot with cold cheese and ensures even melting. Stir until each batch is completely dissolved and the mixture looks smooth and uniform. This takes about 2 minutes total. The milk fat helps the cheese emulsify into the liquid instead of becoming grainy or separating. Don’t let the soup come to a boil during this step—high heat can break the emulsion and make the cheese separate.

Step 6: Add Vegetables and Beef to Complete the Soup
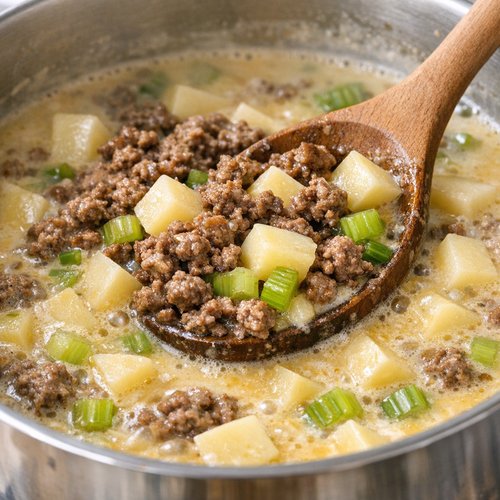
Stir in the diced celery, cubed potatoes, and reserved cooked ground beef. Bring the soup to a gentle boil, then immediately reduce the heat to a simmer. Cover and cook for 10-12 minutes until the potatoes are fork-tender. Don’t cook longer than 12 minutes or the potatoes break down too much and create a starchy, grainy texture. You want them soft but still holding their shape. The potatoes release starch into the liquid, making the soup even creamier without adding any additional thickeners.
Step 7: Taste and Season Before Serving
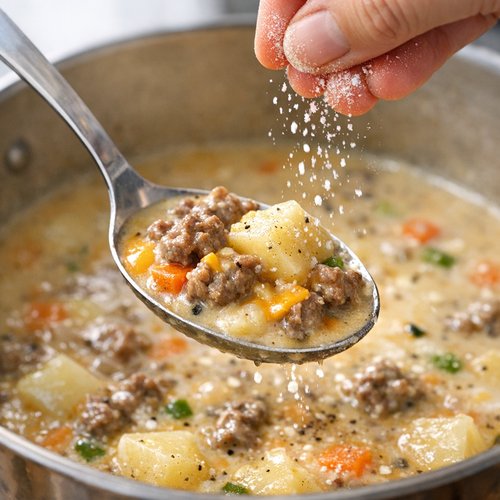
Turn off the heat and taste a spoonful. Because you used low-sodium beef stock, you likely need to adjust salt and pepper. Add salt gradually—a quarter teaspoon at a time—tasting between additions. Remember that the cheese is already salty, so you need less than you’d think. Crack fresh black pepper over the top to brighten the flavors. Ladle into bowls and top with dill pickle chips, which add acid and probiotics that support digestion.
Professional Tips From the Kitchen
- Use Freshly Shredded Cheese, Never Pre-Shredded – Pre-shredded cheese contains anti-caking agents (usually cellulose) that prevent it from emulsifying smoothly into the soup. It clumps and tastes grainy. Fresh block cheese melts into silk within seconds.
- Don’t Skip the Roux Cooking Step – Raw flour has a chalky, unpleasant taste. Those 3-5 minutes of cooking transform it into something nutty and pleasant while stabilizing the starch so it thickens without lumping. This is non-negotiable.
- Keep Your Potatoes Uniform in Size – Cut them into half-inch cubes so they cook evenly. Larger pieces stay firm inside while the outside falls apart; smaller pieces turn to mush. Uniformity ensures every spoonful has the same perfect texture.
- Temperature Control Is Critical for Cheese – Never let the soup boil vigorously while the cheese is melting in. High heat breaks the emulsion, causing the cheese proteins to separate and become grainy. Medium-low heat keeps everything silky.
- Taste Before Adding Salt – Beef stock, cheese, and seasoning blends already contain salt. Most beginner cooks over-salt soup. Add gradually and taste constantly.
Expert’s Nutritional Tip: The Secret Health Benefit You’re Missing
Here’s something I share with patients who think comfort food can’t be healthy: the potato-based soup stock becomes rich in resistant starch as it cools. This matters because resistant starch bypasses digestion in your small intestine and ferments in your colon, feeding beneficial bacteria. If you make this soup ahead and refrigerate it, the potatoes become an even more powerful prebiotic food. You’re not just eating comfort—you’re supporting your microbiome with every bowl. That’s the kind of healing food my grandmother understood instinctively, and now science backs it up.
Ingredient Substitutions and Their Impact
- Ground beef (80/20 blend) -> Ground turkey or chicken (93/7 blend): You’ll lose some of the deep savory flavor and the Maillard reaction will be less pronounced because poultry has lower fat content. The soup becomes lighter and less rich, with 8-10 fewer grams of fat per serving. Cook the same way but expect a slightly less intense cheeseburger flavor. The protein content actually increases slightly (2-3 grams more per serving).
- All-purpose flour -> Cornstarch (use 2 tablespoons instead of 1/4 cup): Cornstarch thickens soup without the nutty, cooked flour flavor. It creates a clearer soup with a slightly slipperier mouthfeel. The downside: cornstarch breaks down if the soup is reheated multiple times, becoming watery. All-purpose flour holds its thickening power indefinitely.
- Sharp cheddar -> Mild cheddar or Gruyère: Mild cheddar makes the soup less complex in flavor; Gruyère adds nuttiness and complexity but costs more. Both melt smoothly without graininess. The flavor profile shifts—sharp cheddar is bright and direct, while Gruyère is subtle and sophisticated.
- Beef stock -> Chicken stock: The soup becomes lighter and less beefy in flavor—you’re sacrificing the deep, rich background note. Use the same amount, but consider adding a teaspoon of Worcestershire sauce to restore umami depth.
- Whole milk -> Half-and-half or heavy cream: Creates a richer, more decadent soup, but each serving gains 4-6 grams of fat and tastes heavier. Use 1.25 cups instead of 1.5 cups because cream is denser. Half-and-half splits the difference, adding richness without excess density.
Dietary Adaptations
Gluten-Free Version: Replace the all-purpose flour with cornstarch (use 2 tablespoons) or a 1-to-1 gluten-free flour blend. Both work to thicken without changing the final texture. The cornstarch version is slightly more transparent; the GF flour blend mimics regular flour most closely. Everything else stays exactly the same. The soup becomes naturally gluten-free without any flavor compromise.
Dairy-Free Version: This is more challenging because cheese and milk are the base. Replace the butter with olive oil (use 4 tablespoons), the whole milk with full-fat coconut milk or oat milk (1.5 cups), and the cheddar cheese with a dairy-free aged cheddar alternative (2 cups). Fair warning: dairy-free cheese doesn’t emulsify as smoothly as real cheese, so you’ll get a slightly grainier texture. The soup will be less rich but still satisfying. Use the same technique and cooking times.
Low-Carb or Keto Adaptation: This soup isn’t naturally low-carb because potatoes contain about 17 grams of carbs per half-cup. To adapt, replace the 4 cups of potatoes with 2 cups of cauliflower florets (chopped small) and 1.5 cups of mushrooms (diced). Mushrooms add umami depth and replicate the meaty texture. The cooking time stays the same. You’ll reduce the carbs by roughly 30 grams per serving while keeping the soup creamy and satisfying. The flavor profile changes slightly—less starchy sweetness, more earthy depth.
Vegan Version: Use plant-based ground beef (brands like Beyond or Impossible), olive oil instead of butter, unsweetened oat milk, and vegan cheddar. The technique stays identical. Expect a slightly different flavor since plant-based meats have different umami profiles than beef, but the soup remains comforting and nourishing. Add a teaspoon of miso paste to the broth for deeper savory complexity.
Make-Ahead Guide: Meal Prep Like a Pro
This soup is one of my favorite make-ahead meals because it actually improves after a day in the refrigerator—the flavors deepen and marry together. Here’s my professional approach:
Full Soup Made Ahead: Make the complete recipe and cool it completely (about 1 hour at room temperature, then refrigerate). It keeps for 3-4 days in an airtight container. When reheating, warm gently over medium heat, stirring occasionally. If the soup thickens too much (the starch from potatoes continues to absorb liquid as it sits), thin it with a splash of milk or broth.
Component Prep for Busy Weeknights: Brown the ground beef with Montreal seasoning and store in an airtight container for 4 days. Prep the onions, garlic, celery, and potatoes in separate containers (potatoes in water to prevent browning) for 3 days. On cooking day, you just combine everything and the soup takes 25 minutes instead of 40.
Freezing Instructions: Cool the soup completely, then pour into freezer containers or gallon bags, leaving one inch of headspace (soup expands as it freezes). Label with the date. The soup freezes well for up to 3 months. Thaw overnight in the refrigerator, then reheat gently on the stovetop. The texture stays creamy, though you might notice the potatoes become slightly softer after thawing—this is normal and doesn’t affect deliciousness.
Can I Store Cheeseburger Potato Soup Recipe?
Storage science is about understanding how fats, proteins, and starches interact over time. Soup is one of the most shelf-stable comfort foods when stored properly because the liquid environment slows bacterial growth.
Refrigerator Storage: Cool the soup to room temperature within 2 hours of cooking (bacteria multiply rapidly in the 40-140°F “danger zone”), then refrigerate in airtight containers. The soup keeps for 3-4 days. The starch from potatoes will continue absorbing liquid as it sits, making the soup thicker. This isn’t spoilage—it’s starch gelatinization. Simply thin with milk or broth when reheating. Look for off-smells or mold growth as spoilage signs, not texture changes.
Freezer Storage: The soup freezes beautifully for up to 3 months. The high fat content from cheese and beef protects it from freezer burn. Use freezer-safe containers or gallon bags. Leave one inch of headspace because water expands when frozen. Thaw overnight in the refrigerator, then reheat gently. The potatoes become softer after freezing, but the flavor intensifies.
Reheating Method That Preserves Quality: Don’t microwave this soup if you can avoid it—microwaves heat unevenly and can break the cheese emulsion. Instead, reheat on the stovetop over medium-low heat, stirring occasionally. This takes 10-12 minutes and allows the flavors to wake up gradually. If you must microwave, use 50% power and stir every minute to prevent overheating.
Nutrition Information
Based on USDA nutrition data and standard recipe analysis software (assuming 6 servings from the full recipe), here’s what you get per serving:
Per Serving (approximately 1.5 cups): 520 calories | 32g protein | 35g fat (14g saturated) | 22g carbohydrates | 2.2g fiber | 2.1g sugar | 850mg sodium | 680mg potassium | 220mg calcium | 2.8mg iron
This is a nutrient-dense meal that delivers meaningful amounts of complete protein (32 grams covers 60% of a 2,000 calorie diet’s protein needs), bioavailable iron, B vitamins, and calcium. The carbohydrates come primarily from potatoes, which provide both quick energy (glucose) and slower-digesting starch. The 2.2 grams of fiber supports digestive health. The 850mg of sodium is moderate for a soup—it comes from beef stock, cheese, and seasoning, but it’s below the USDA recommendation of keeping individual meals under 800-900mg if eating three meals daily.
If you’re concerned about sodium, use no-salt-added beef stock and reduce the Montreal seasoning to three-quarters tablespoon. You’ll lose some flavor complexity, but the sodium drops to approximately 620mg per serving. The fat content (35 grams) primarily comes from beef and cheese—these are nutrient-dense fats that help absorb fat-soluble vitamins A, D, E, and K. Saturated fat is 14 grams (roughly 21% of daily value), which is moderate and comes from nutritious whole foods, not processed sources.
Common Mistakes to Avoid
Mistake 1: Draining the Beef’s Rendered Fat – I see cooks drain the beef after browning, trying to reduce fat content. This removes flavor compounds and creates a one-dimensional, thin-tasting soup. The fat is where the flavor lives. Keep it in the pot. If you’re concerned about fat intake, use 90/10 ground beef instead, which gives you less fat from the start without sacrificing the browning process.
Mistake 2: Skipping the Roux Cooking Step – Some cooks add flour and immediately add liquid, thinking they’re saving time. Raw flour creates a chalky, unpleasant taste that ruins the whole soup. Those 3-5 minutes of cooking transform flour into something nutty and pleasant. Non-negotiable.
Mistake 3: Using Pre-Shredded Cheese – Pre-shredded cheese contains cellulose anti-caking agents that prevent smooth melting. It creates a grainy, separated soup instead of creamy silk. Buy a block of sharp cheddar and shred it yourself using the large holes of a box grater. It takes two minutes and transforms the final result.
Mistake 4: Overcooking the Potatoes – Cook for exactly 10-12 minutes after bringing to a boil. Any longer and the potatoes break down completely, creating a starchy, grainy texture instead of tender chunks. Use a fork to pierce one cube—it should slide through with gentle pressure, not fall apart.
What Can I Serve With Cheeseburger Potato Soup Recipe?
Flavor pairing is science. Certain foods complement each other because their flavor compounds interact in our mouth and nose to create new sensations. This soup is rich, savory, and slightly salty, so it pairs beautifully with foods that add brightness, crunch, or acid.
- Crusty Sourdough Bread or Focaccia – The bread’s tanginess from fermentation balances the soup’s richness, and its structure gives your teeth something to do. The starch in bread also helps your body absorb the soup’s fat-soluble nutrients more efficiently.
- Simple Green Salad with Vinaigrette – The acid from vinegar cuts through the richness of the cheese and beef, resetting your palate between spoonfuls. Crisp lettuce provides textural contrast to the soft soup.
- Pickled Vegetables (Beyond the Garnish) – Fermented pickles contain probiotics that support the digestive process, and their acid brightness prevents soup fatigue—that bored feeling you get eating something rich for too long. Try Mexican Pinwheels as a complementary appetizer that adds fresh flavor and crunch.
- Grilled Cheese Sandwich (Yes, Really) – I know it sounds excessive, but there’s a reason diners serve this combination. The crispy bread exterior and melted cheese create a textural and flavor experience that complements the soup’s richness. It’s indulgent comfort on purpose.
- Roasted Vegetables Like Broccoli or Brussels Sprouts – The slight bitterness and char from roasting add complexity that prevents the meal from tasting one-note. Roasted vegetables also provide fresh nutrients that balance the soup’s richness.
- Apple Slaw with Light Dressing – The apple’s natural sweetness and slight tartness complement the savory soup beautifully. The crunch provides textural contrast.
Seasonal Variations: Keeping This Classic Fresh Year-Round
Spring Version: Replace half the potatoes with diced fresh asparagus and add 1/2 cup of fresh peas in the last 2 minutes of cooking. Add two tablespoons of fresh lemon juice at the end to brighten the flavors. The soup becomes lighter and more vegetable-forward while maintaining the cheeseburger base. Spring onions (scallions) make an excellent garnish instead of dill pickles.
Summer Version: Use corn kernels (fresh or frozen) instead of half the potatoes, and add diced fresh tomatoes and fresh basil in the last minute of cooking. This creates a corn chowder variation on the cheeseburger theme. The tomato’s acid brightens everything. Serve slightly cooled (not cold) on hot days.
Fall Version: Add one tablespoon of Worcestershire sauce and one-half teaspoon of smoked paprika to the broth for deeper, smoky richness. Replace one-quarter of the potatoes with diced sweet potato for natural sweetness that complements the cheese. Crispy bacon bits make an excellent garnish alongside the pickles. This version tastes more like autumn.
Winter Version: This is when the classic version shines, but you can add one teaspoon of sharp mustard powder to the broth for extra depth. Increase the black pepper slightly for more spice. Top with crispy fried onions for textural contrast. This version tastes intentionally indulgent and satisfying during cold months.

Cheeseburger Potato Soup Recipe
Ingredients
Method
- Place your soup pot over medium-high heat and add one tablespoon of butter. Once the foam subsides (about 30 seconds), add your ground beef and Montreal seasoning. Here's the critical part: don't stir it constantly. Let the meat sit undisturbed for 2-3 minutes so the surface makes contact with the hot pan. This creates the Maillard reaction—browning that develops hundreds of complex flavor compounds. Use a wooden spoon to break the meat into small, even crumbles. You're looking for no pink remaining, which takes about 6-8 minutes total. The rendered fat from the beef is liquid gold for flavor, so don't drain it. Remove the cooked beef to a clean bowl and set aside.
- Lower your heat to medium and add the remaining three tablespoons of butter to the same pot (keeping all that browned beef residue on the bottom). Add your chopped onion and stir occasionally. This is where patience matters. You're not rushing to brown the onions—you're slowly softening them, which takes about 10 minutes. As the onions cook, their natural sugars convert into caramelized compounds that add subtle sweetness and savory depth. You want them soft and translucent, not crispy. Once they're there, add your minced garlic and cook for exactly 2 minutes. Any longer and garlic turns bitter; any shorter and its sulfur compounds don't develop properly.

- Sprinkle the all-purpose flour over the softened onions and garlic. Stir constantly for 3-5 minutes. This cooking time is essential—you're cooking out the raw flour taste while the flour particles absorb the fat. The flour coats itself in butter, which prevents lumps from forming when liquid hits it later. You're looking for a paste-like consistency that smells nutty and toasted, not raw or grainy. This is the foundation of your soup's texture.
- Slowly pour in the milk and beef stock while stirring constantly. This is where the roux does its job—the fat-coated flour particles absorb the liquid and swell, thickening it naturally. Stir for about 1 minute until you don't see any lumps. The mixture should look creamy and relatively smooth. If you see small flour lumps, use an immersion blender for 10 seconds to break them up. You're not making a thick gravy yet; this is your soup base.
- Add your freshly shredded cheddar cheese in three batches, stirring between each addition. This prevents overwhelming the pot with cold cheese and ensures even melting. Stir until each batch is completely dissolved and the mixture looks smooth and uniform. This takes about 2 minutes total. The milk fat helps the cheese emulsify into the liquid instead of becoming grainy or separating. Don't let the soup come to a boil during this step—high heat can break the emulsion and make the cheese separate.

- Stir in the diced celery, cubed potatoes, and reserved cooked ground beef. Bring the soup to a gentle boil, then immediately reduce the heat to a simmer. Cover and cook for 10-12 minutes until the potatoes are fork-tender. Don't cook longer than 12 minutes or the potatoes break down too much and create a starchy, grainy texture. You want them soft but still holding their shape. The potatoes release starch into the liquid, making the soup even creamier without adding any additional thickeners.

- Turn off the heat and taste a spoonful. Because you used low-sodium beef stock, you likely need to adjust salt and pepper. Add salt gradually—a quarter teaspoon at a time—tasting between additions. Remember that the cheese is already salty, so you need less than you'd think. Crack fresh black pepper over the top to brighten the flavors. Ladle into bowls and top with dill pickle chips, which add acid and probiotics that support digestion.

Notes
FAQs
Why Does My Soup Taste Thin and Bland Instead of Rich and Savory?
You likely skipped searing the beef properly or drained the rendered fat. The Maillard reaction from browning develops the savory depth, and the fat carries flavor. Also check that you’re using low-sodium beef stock (not regular salted broth, which makes it hard to control final seasoning) and that you actually tasted and seasoned before serving. Finally, make sure you’re using freshly shredded sharp cheddar, not mild or pre-shredded. Sharp cheddar has more complex flavor compounds that create that “cheeseburger” taste you’re after.
My Cheese Broke and Became Grainy and Separated. How Do I Fix This?
Overheating broke the cheese emulsion—the proteins separated from the fat. Immediately remove the pot from heat and whisk in one tablespoon of cold milk or cream while whisking constantly. This cools the soup slightly and adds more fat to re-emulsify the broken cheese. If that doesn’t work, pour the soup through a fine-mesh strainer into a clean pot, then slowly reheat the liquid while whisking in new shredded cheese one-quarter cup at a time over low heat. For next time, keep the heat at medium-low while the cheese is melting—never let soup boil vigorously with cheese in it.
Can I Use Immersion Blender to Make It Creamier?
Yes, but carefully. If you want a completely smooth, blended texture, blend for 30-45 seconds until no potato chunks remain. You’ll lose the cheeseburger soup’s classic chunky texture in exchange for more smoothness. I don’t recommend full blending because part of the appeal is texture. Instead, use an immersion blender for just 10-15 seconds to break up any flour lumps early in cooking. This gives you the best of both worlds—smooth cream base with tender potato and meat chunks.
How Do I Prevent Potatoes From Becoming Mushy?
Cut them into uniform half-inch cubes (not smaller, not larger), and time them carefully. Add the potatoes with the broth, bring to a boil, then reduce to a simmer. Cook for exactly 10-12 minutes. Use a fork to check doneness—it should slide through with gentle pressure. If you’re uncertain, remove one cube and taste it. The first time you make this soup, you’re learning what “tender but not mushy” feels like. Remember that potatoes continue cooking slightly after you remove from heat due to carryover cooking, so pull them when they’re just slightly firmer than your target.
My Soup Is Too Thick. How Do I Thin It Without Losing Flavor?
Add more liquid slowly while tasting. For each cup of soup, add broth or milk in one-quarter cup increments, stirring and tasting between additions. If you add regular milk, the soup becomes creamier. If you add beef broth, it stays more savory. I prefer a 1:1 ratio of milk to broth for thinning, which maintains the creamy-savory balance. Start with one-quarter cup at a time because it’s easy to add more liquid than to remove it. Avoid watering down the flavor by using broth or milk, not plain water.
More Recipes You’ll Love
- BBQ Spatchcock Chicken Recipe – A grilled main course that pairs beautifully with this soup’s rich flavors
- BBQ Ribeye Recipe – For when you want beef-forward comfort on the grill
- this simple cake – Maryland comfort food that celebrates local ingredients the way this soup does
- Basic Roux Recipe – Master the technique that makes this soup creamy and understand it deeply
Final Thoughts: Cooking With Confidence and Joy
Making this soup reminded me why I became a dietitian in the first place. Food isn’t just fuel—it’s connection, memory, and nourishment all in one bowl. This recipe works because it respects the science of flavor development while honoring the emotional comfort we all need sometimes. When you understand why each technique matters and what each ingredient does, you move from